OK, so a cute story for my 6 readers of the blog. I learned how to make this recipe during high school when I was about 16-ish. I invited my best friend and her boyfriend over to "my" house, along with my boyfriend (now husband). It was a double date you see. This is what I made to impress them. Though, come to find out my husband doesn't like the crust on his pizza- and what is this aside from a pizza with A LOT of crust? I like a lot of crust and prefer this over my regular pizza recipe simply because I have more control of how much sauce I use. Since I promised you 6 readers that I would take good photos the next time I made a braided pizza - I had the perfect excuse to make what I wanted. :)
I tweaked the recipe a bit this time around - as I didn't have the energy to go all out and make the sauce completely by hand.
For this recipe you will need a good pizza dough and sauce recipe. Of course you can always buy pre-made dough, I prefer using homemade dough simply because it's always super hard for me to roll out the store bought doughs. You'll also need the ingredients for the inside and outside of the braided pizza, those ingredients are listed later.
First- start with the sauce.
SAUCE
As I mentioned, I used a different sauce recipe than the one attached to the link above. My original sauce recipe is good if you have A LOT of time - and really like chopping fresh tomatoes. This was the first time I used this sauce recipe, and typically I don't tweak recipes unless I've tried the original. I did tweak this recipe this time though. As a personal preference I like "wetter" (for lack of a better word) sauces. The recipe is good - but it's incredibly THICK. I tried to thin it out using a tablespoon at a time of water (ended up adding 6 T. of water) and it only helped a little. I just so happened to have a can of diced tomatoes with oregano, basil and garlic and decided to dump the whole can in and ended up with the perfect consistency. Also, this sauce recipe is really yummy. :)
While the sauce is slowly simmering, start the dough.
PIZZA DOUGH
(Copied from my Pizza blog post I linked to above.)
INGREDIENTS
2 1/2 to 3 c. Flour
1 pkg. active dry yeast
1 t. salt
1 c. warm water
2 T. oil
DIRECTIONS
In large mixing bowl combine 1 1/4 c. of flour, the yeast and salt. Stir in the warm water. Beat at low speed with mixer. Stir in as much of the remaining dough as you can mix with a spoon. Turn dough onto lightly floured counter top and kneed in enough of the remaining flour to make a smooth and elastic dough (6-8 minutes). Place dough in a large bowl and cover bowl with a warmed wet towel and let rest for 10 minutes.
***FYI - the above directions are so much easier if you have a dough hook attachment on your mixer. Saves you lots of time.***
THE INSIDES (AND OUT)
INGREDIENTS
4 ounces-ish of shredded mozzarella cheese (or whatever cheese you prefer)
1 pkg. of pepperoni
1/4 c. olive (or vegetable) oil
1 t. dried basil
1 t. dried oregano
2 T. Parmesan cheese
Heat oven to 400 degrees.
Ok, let the fun begin.
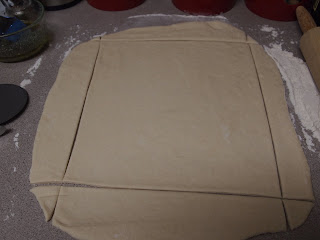
Roll the dough out.
You'll want to cut the dough into about a 12x8 inch rectangle. I didn't measure mine - I just eyed it. A pizza cutter makes cutting the dough a lot easier.
From here - you'll place a single layer of pepperoni in the center of the dough. Leave yourself about an inch and half buffer on each side.
Then, top your pepperoni with your cheese. After you placed your cheese on top of your pepperoni, take a paring knife and make slits about 1 inch apart along the sides of the dough coming to within a 1/2 inch of your filling.
Starting at the top, make your dough "hug" the filling. Once the two sides meet, pinch them together so that they stay.
Continue this process all the way down to the bottom of the dough.
Carefully transfer your braided pizza to a cookie sheet.
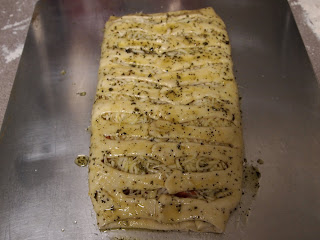
In a separate bowl combine the oil, basil, oregano and parmesan cheese. Using a brush, brush the oil and spices on top of your dough.
Place dough into your pre-heated 400 degree oven for about 20 minutes, or until dough becomes golden brown.
Serve with your sauce and enjoy. :)


